Como Escolher um Trilha
Antes de você poder desfrutar das maravilhas da natureza e ver o pôr do sol de sua barraca, primeiro você deve decidir para onde ir. Aqui está como encontrar o melhor local para iniciantes.
1. Visit a region you connect with
Start with a place that inspires you or that you have a personal connection to. Sure, national parks have plenty of allure, but hiking through an area that your ancestors once traveled or where you feel nostalgia can be worth so much more. Researching the Indigenous presence and history of that specific region will also add significance to where you choose to travel.
The internet is a great place to begin choosing your trail: Search apps like Gaia GPS, AllTrails, Hiking Project, and Komoot for well-established routes.
2. The path less traveled isn’t for everybody.
It’s OK to choose a trail that isn’t in the deep woods or over sky-scraping mountains. As a beginner backpacker, having other hikers around can be comforting. Lose the mentality that backpacking at its purest is a rough and tough activity—if you’re nervous, choose a hike that runs near amenities such as public restrooms, designated campsites, and water spigots. When you’re ready to level up, go for a trail with ample camping opportunities and abundant natural water sources.
3. Scope out the details.
Since you’re not used to hiking with a heavy pack, plan to cover less distance in a day than you would on a dayhike. Start with around 5 miles per day to get comfortable. Make sure you know where the campsites and water access points are, along with potential fire hazards, and where you can bail out if things go south. Read trip reports online and study topo maps to get a sense of the landscape. Talk with an experienced backpacker, a ranger, or a local guide for more information.
4. Elevate your game.
An elevation profile is a visual representation of the total ascent and descent of a trail, and can give insight into its difficulty. Most apps and guidebooks contain these graphics. Everyone’s ability and experience level varies, but it’s a good idea to choose a trail with mellow elevation gain for your first backpacking trip (think less than 1,500 feet of ascent per day).
Jalen Bazile (he/him) is a professional outdoorsman and entrepreneur based in Denver, Colorado, and northwest Arkansas.

Food, Glorious Food
Eating on the trail is one of backpacking’s greatest joys. But how much should you pack? By Emma Veidt
Backpackers face the tricky challenge of bringing enough food to stay fueled without overloading their packs. Everyone needs to eat, though, and the number of calories you require each day depends on several variables, such as how many miles you’re hiking, your body weight, and more.
It’s a good rule to snack every 60 to 90 minutes, according to registered dietician Aaron Owens Mayhew, founder of the backpacking meal planning resource Backcountry Foodie.
There are a few options to consider when choosing meals. Dehydrated entrees are light and convenient, but they can be pricey. Ramen noodles, boxed macaroni, and oatmeal are affordable alternatives. Everything you plan to eat has to go on your back first, so consider weight efficiency when meal prepping. Be strategic about calorie density: If you can eat 200 calories in 4 ounces of food or in 1 ounce, pick the lighter option. Fresh ingredients also weigh more than dehydrated meals. If you prefer to cook with the real deal, avoid cans, heavy perishables, and bulky packaging.
High-Calorie Foods to Fuel Your Hike
– Olive oil: 250 calories per ounce (add to dinners for deeper flavor)
– Walnuts: 185 calories per ounce
– Peanut butter: 167 calories per ounce
– Snickers bar: 134 calories per ounce
Backpacking Skills You Already Have
Life skills transfer to nature-based activities, too. By Kriste Peoples
Doing new things as an adultcan be intimidating, and there’s no doubt that trekking in the wilderness, cooking over camp stoves, and sleeping outside is challenging. But when you view backpacking as an adventure, you not only open yourself to exciting new possibilities; you might discover talents you weren’t aware of.
The first time I went backpacking, I harbored fears of everything I thought would go wrong. How big and intimidating should I make myself if I run into Sasquatch? Who should I eat first if the food runs out? How will I sleep if I can’t stream calming nature videos before bed?
Whether you know it or not, you already possess skills to help you create a great experience. If you’re feeling underprepared for your first time out, let this list help set you up for success.
1. Street smarts. Being aware of your surroundings is as valuable in the backcountry as it is in the concrete jungle. Use that awareness to discern who and what is around you.
2. Speaking up. If you have questions, ask. Just because you’re new to an experience doesn’t mean you have to leave your intuition, curiosity, needs, and common sense behind.
3. Teamwork. Backpacking is more fun for you (and your hiking partners) when you step up to share responsibilities on trail and in camp. Offer support where you’re needed and feel most comfortable, and remember that you can ask for it, too.
4. Reading. Before you go, make sure you understand the demands of your trip. While you’re backpacking, read all of the signs, maps, and directions on your route, rather than relying on others to do it for you.
5. Being yourself. Knowing who you are—and expressing yourself authentically—benefits you and your hiking partners because it means there’s no need to pretend, withhold, or dismiss any aspects of you. Being yourself goes a long way toward helping you relax, build trust, and feel safe in new surroundings.
Kriste Peoples is a Denver-based trail runner, writer, outdoor guide, and mindfulness meditation teacher.
A Word on Safety
Having a contingency plan can help you enjoy the hike even more. By Emma Veidt
Before you go on your adventure, send someone your itinerary and tell them when you plan to return. Stick to your plan as much as you can. Sometimes sudden emergencies arise: Your itinerary should also include potential backups or alternate routes, just in case.
It’s not enough just to buy a first aid kit and bury it in your pack. Wilderness first aid courses (scan the code above to access ours) can help you prepare for emergencies that might occur in the backcountry. Know how to use the items in your med kit before you hit the trail.

Gear Up
Here’s how to bring the right equipment. By Benjamin Tepler
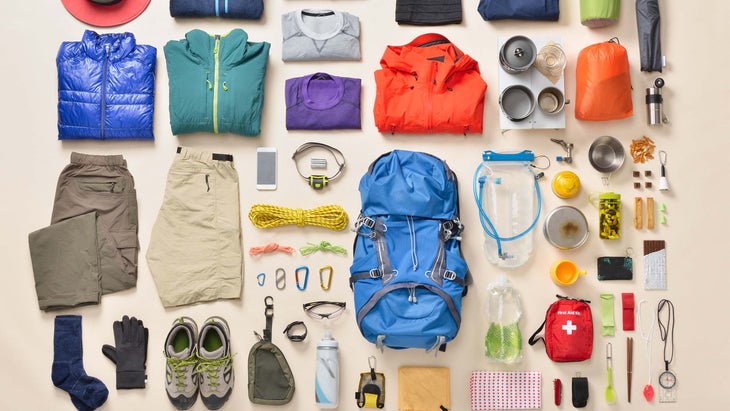
It can feel daunting to think about all of the gear required when you upgrade from dayhiker status to a full-blown backpacker. But don’t panic: You likely have a good chunk of the necessary equipment in your trail-tested dayhiking kit. Common overlapping items include footwear, apparel, water bottles, and the 10 Essentials. Apart from food, toiletries, and a stove (if you want a warm meal), all that’s left is “The Big Three”—a pack, shelter, and sleep system. Before you splurge on the latest and greatest equipment, know that there are low-cost alternatives. You can rent gear at REI, for example, for as little as $72 for for a tent, pack, and sleep system. Full “Basic Backpacking Kits” are available for $137 for the first night. Many local gear shops have bargain basement sections where you can buy used gear for dirt cheap, or check out a reputable used gear shop, like Geartrade, online.
Expert Tip: Forethought is Key
“Do things that prevent needing to use first aid, especially as a beginner. Protect yourself from heat and cold, filter your water, and take care of your feet. If you have a hot spot, address that as soon as possible.”
Patricia Cameron is the executive director and founder of Blackpackers, whose mission is to create economic equality in the outdoors.
Maps, GPS, or Both?
You’ll need to know where you are and where you’re going on the trail. But what’s the best tool for the job? By Peter Moore
“I’m a ‘both’ guy right now,” admits Eric Larsen, polar explorer and instructor for Backpacker’s Intro to GPS Navigation course. “I love laying out a map and scanning a whole region, but I outfit my sled with solar panels on my arctic trips to power my GPS. Electronics are a valuable tool.” Should you be a map maven or a GPS groupie? Follow Larsen to a decision.
Paper Maps
PRO: Operate without batteries or cell service.
PRO: Display the entire region so you can pick out points of interest and escape routes.
CON: Can be troublesome in rain and wind.
CON: You must be confident reading them, determining your location, and coordinating with your compass.
GPS Units and Apps
PRO: The world, downloadable and at your fingertips. (Are you a member of Outside+? The included Gaia GPS and Trailforks apps give you routes and maps all over the planet.)
PRO: That little pointer says “you are here” in a way a map never will.
PRO: “If things go south,” says Larsen, “you can call for help.” (This is only true for sattelite messenger-GPS combos.)
CON: Batteries die. Larsen turns on his unit only at key trail junctures.
CON: The world is big, but your screen is small, so you might not notice that cliff-out until it’s too late.
CON: They can make you complacent. In 2019, a dozen drivers obediently followed Google Maps off of a highway and into mud holes.
You can never have too much directional know-how. Use a map and compass for planning and backups. Learn the GPS for mid-route guidance or emergencies. When you use both to their full advantage, you can’t lose (or get lost).
Setting the Pace
A heavy pack will slow you down, so set more modest distance goals than you would on a dayhike. By Emma Veidt
In 1892, Scottish mountaineer William Naismith created a formula for calculating hiking pace: Allow an hour for every 3 miles, plus an additional hour for every 2,000 feet of elevation gain. This, however, is a simplified rule that doesn’t account for the variables that can affect your pace, such as unexpected weather, overall fitness, pack weight, and tricky terrain. Plan to average one mile per hour, which takes into consideration your heavy pack, any navigation holdups, and necessary snack or meal breaks. If you end up hiking faster, revel in the extra time by enjoying the views from your camp.
Expert Tip: Simplify Snacktime
“The main reason why people don’t snack on the trail is because of the hassle of taking off a heavy pack, opening it up, grabbing the snacks, and then putting the pack back on. However, if you keep your snacks in an accessible place like a fanny pack, the process of snacking becomes easier and more enjoyable.”
Conley Harris is a student and beach volleyball player at Vanguard University and creator behind the @harrishikers TikTok and Instagram accounts.

Home Sweet Camp
Choosing a campsite and setting up camp is where the fun starts. Get it right with this advice from Cedar Yelvington, backpacking leader, policy developer, and risk management coordinator for The Venture Out Project. By Zoe Gates
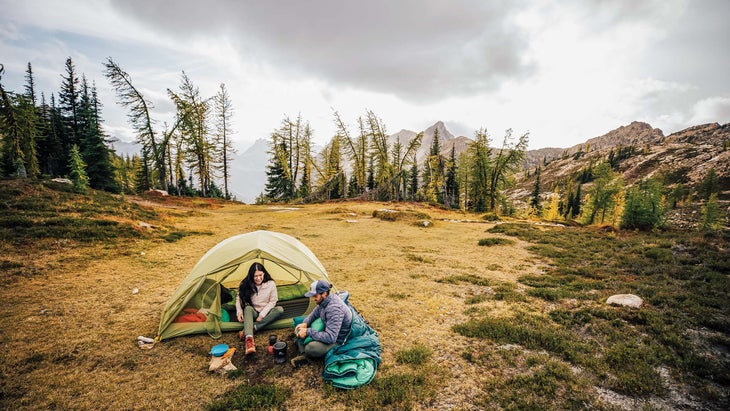
If you’ve planned ahead, finding a place to camp can be as easy as rolling up to your predetermined destination and calling it home. But if you’re winging it, you’ll have to develop an eye for recognizing good camping spots while you hike. Practicing situational awareness is key to successful backpacking trips, says Yelvington. Campsites might not always be obvious from the trail: Look for clues like social trails (faint footpaths shooting off from the official trail), accessible bodies of water, and open, flat areas below the treeline. As you hike, keep an eye out for spots that could make decent campsites. If you don’t make it to your destination or need to turn back, having these as backups could prove useful.
Welcome to Your Perfect Campsite
-Keep your distance—at least 200 feet—from the trail. Privacy is nice for you and for other hikers.
-Pitch your tent on level ground where rainwater won’t pool. Keep your impact to a minimum: If it looks like other hikers have pitched their tent there, you should too. Look up to identify dead branches or other overhead hazards.
-In grizzly bear territory, your kitchen should be at least 100 yards away from your sleeping area. Flat rocks and logs for seating are bonuses.
-Dense trees, brush, or boulders some distance away from camp make for good bathrooms. For tips on doing your business outside, go to backpacker.com/poop.
-Water should be close by, but keep your tent 200 feet from the shore. Filter your drinking water to remove viruses and bacteria. Gravity filters and pumps work great, or go high-tech with UV light treatments (bring a pre-filter). Chemical treatments like iodine tablets or chlorine dioxide drops are an affordable, lightweight alternative. If your water filter breaks in the backcountry, you can boil water, too: Bring water to a rolling boil for 1 minute (3 minutes if you’re above 6,500 feet).
-Protection from the wind in the form of trees, boulders, or topographical features makes for a more pleasant evening.
Your In-Camp To-Do List
Congrats! You made it to camp. Now what?
- Take a breather. The hiking may be done, but the work isn’t. Rest for a few minutes and have a snack before diving into camp chores.
- Survey the area. Scope out possible spots for your tent, kitchen, bathroom, etc.
- Get comfy. Take off your boots and layer up. Camp shoes = happy feet = happy camper.
- Filter some water. Even if your bottle is full, you’ll want plenty of clean water for cooking and topping off before bed.
- Fuel up. If you’re making a dehydrated meal, allow 15 to 20 minutes for the food to rehydrate.
- Set up your sleeping arrangements. Pitch your tent and pull out your sleeping pad and bag well before bedtime so it’s ready for sleep when you are.
- Grab your headlamp while it’s still light out.
- Before bed, make sure your food is stored in a bear bag, bear canister, or bear-proof sack (be sure to check regulations for the area). Not sure which storage method is right for you? Scan the code to the left.
- Relax! Break out the playing cards or hit the hay. This is what backpacking is all about.
Leave No Trace: The 7 Principles Cheat Sheet
All hikers and backpackers have a responsibility to take care of the land where they recreate. Be mindful of the following LNT guidelines when on the trail.
1. Plan ahead and prepare. Thinking ahead keeps you safe and leads to minimal impact on natural resources.
2. Travel and camp on durable surfaces. Be mindful of sensitive vegetation while hiking and in camp. Stay on trails when you can; step on rocks and packed earth when you can’t.
3. Dispose of waste properly. Carry it in, carry it out. Bring a small trash bag or ziplock for waste. (That goes for dog poop and toilet paper, too.)
4. Leave what you find. Photos make the best souvenirs.
5. Minimize campfire impacts. Check local regulations before starting a blaze, and use existing fire rings where possible.
6. Respect wildlife. Observe from a distance, and never feed wild animals.
7. Be considerate of other visitors. Everyone should feel welcome outside.
